Important Notes
High quality sample prep is essential to CUT&Tag assay success and is the main variable we see when troubleshooting customer experiments. To ensure high quality sample prep, examine samples at three steps:
Initial cell harvest: Cells have high viability (>80%), are unclumped, and show expected morphology.
After nuclei extraction: Nuclei in CUT&Tag Wash Buffer are intact with clear borders and show minimal lysis.
After ConA bead binding: Majority of nuclei are bound to ConA beads.
Initial cell harvest
This refers to checking cell quality at the beginning of the CUT&Tag protocol, in the section Nuclei Prep and Binding to Beads. Low starting cell viability, poor morphology, and cellular lysis increase assay background, so it is important to carefully examine cells prior to each experiment.
Method: Count starting cells and determine viability using our Trypan Blue staining protocol. Examine cellular integrity and morphology using a brightfield/phase microscope.
Expected results:
Cells should show expected morphology, are unclumped, and display high viability (>80%). See Figure 1A.
Acceptable viability may vary depending on your cell type (primary vs. cell line), if cells have been treated/stimulated, and other factors. For instance, nuclei from K562 cells typically show >90% viability, while for other cell types or conditions, the optimal viability may be lower. Make the best decision based your sample type.
For cultured cells, we recommend obtaining nuclei from cells that are ~70% confluent; do not use overgrown cells.
Troubleshooting:
Evaluate cell culture conditions.
Use fresh media and examine potential contamination issues.
Increase centrifugation time (keep speed the same) if losing cells during spins.
Next step in protocol: Harvest 100,000 cells per reaction, plus 10% excess to account for sample loss.
After nuclei extraction
This check is performed just prior to ConA bead binding, and represents the final sample quality check before starting CUT&Tag. The purpose of this step is to confirm that washed nuclei show normal morphology, are unclumped, and remain intact, which is critical for CUT&Tag workflows. Lysis and/or debris may increase background noise and cause bead clumping during the experiment, and should be avoided. See our Nuclei Extraction Protocol for more details about obtaining high-quality nuclei.
Method: Determine total nuclei counts using our Trypan Blue staining protocol. Examine nuclei integrity and morphology using a brightfield/phase microscope.
Expected results:
Nuclei should be >95% “dead” (Trypan Blue positive). See Figure 1B.
Nuclei should have clear borders, be unclumped, and free of cellular debris (Figure 1B).
Ensure that total nuclei counts provide ~100,000 nuclei per reaction.
Troubleshooting:
If nuclei show attached cell membranes and/or are not fully extracted, further optimization is required. We recommend monitoring cells during nuclei extraction by Trypan Blue staining to select the ideal time point to start sample collection. A second incubation with fresh Nuclei Extraction Buffer can be added, but may result in sample loss.
If nuclei are over-digested, we recommend monitoring cells during extraction by Trypan Blue staining. Reduced digestion may be ideal for some cell types.
Next step in protocol: Binding nuclei to ConA beads.
After ConA bead binding
This step is to confirm ConA bead binding. In the Manual section Nuclei Prep and Binding to Beads, 10 µL of supernatant following ConA bead binding is used to confirm that the majority of nuclei are bound to beads. 10 µL of reaction slurry is also checked, to ensure that nuclei bound to beads are intact.
Method: Examine supernatant and reaction slurry using our Trypan Blue staining protocol.
Expected results:
Supernatant contains very few nuclei (Figure 1C).
The reaction slurry (Figure 1D) shows that >95% of nuclei are Trypan Blue positive and surrounded by ConA beads. Minimal debris and lysis are observed.
Troubleshooting:
Ensure ConA beads were never frozen.
Starting cells and/or extracted nuclei were not clumped.
ConA Beads did not dry out or become clumped.
All buffers were correctly prepared.
Next steps: Proceed to Primary Antibody Binding.
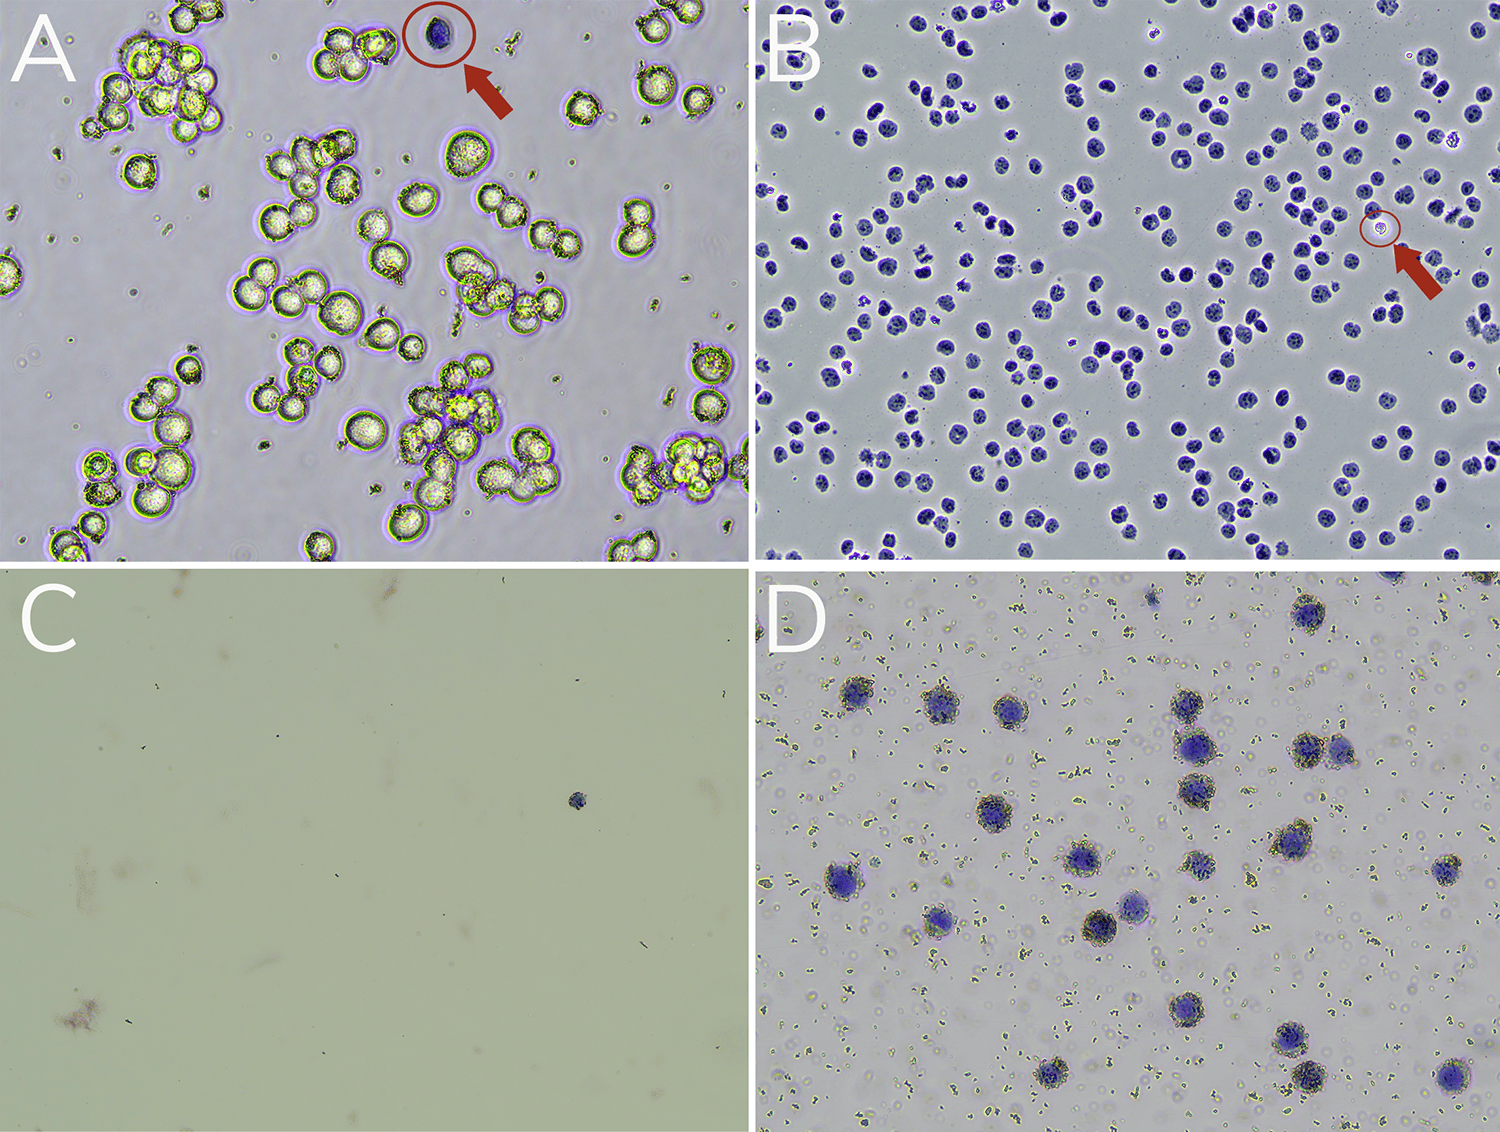
Figure 1. Validation of sample prep using Trypan Blue staining. (A) Starting cells are mostly viable (bright white and round). A dead cell (blue, Trypan positive) is circled in red. (B) Successful nuclei harvest shows Trypan Blue stained nuclei. An intact cell (bright white, Trypan negative) is circled in red. (C) Following ConA bead binding, the supernatant has minimal nuclei. (D) The final reaction slurry contains nuclei successfully conjugated to activated ConA Beads (brown specks).