Like all experiments, CUT&RUN requires thoughtful experimental design. Some steps may require user-specific optimization. For ease, we have broken these down into four main steps, outlined below.
Step 1. Sample Preparation
Number of Cells. We recommend starting with 100,000 native (unfixed) nuclei, particularly when mapping new targets or using new cell types.
Notes on cell types: EpiCypher has developed several protocol variations to ensure reliable CUT&Tag data from diverse biological samples. For recommendations on alternate sample prep protocols (e.g. using adherent cells, tissues, immune cells, nuclei, and frozen cells/nuclei), see the Sample Prep section.
Notes on using tissues: CUTANA™ CUT&Tag is compatible with tissues. See the Sample Prep section for more information.
Notes on low inputs: Following initial validation of workflows using 100,000 cells and control antibodies, and validating antibodies to experimental targets (see Step 3 below), cell numbers can be reduced. For select targets, our CUT&Tag protocol has been validated down to 10,000 nuclei per reaction.
Replicates. CUT&Tag is a technique for mapping histone PTMs. Two biological replicates (e.g. same cell type harvested from two mice) per target are usually sufficient.
Cross-linking. CUT&Tag is a native technique, meaning that it performs best on unfixed nuclei or cells. However, when mapping labile histone PTMs, such as histone acetylation or phosphorylation, or when doing time-course or drug treatment assays, there may be some benefit to trying cross-linking. Note that we always recommend trying native conditions first, or at least in parallel with cross-linked samples. See this blog and our cross-linking protocol for detailed information.
Optimization of Cell permeabilization - only required when using whole cells for CUT&Tag. If using intact cells for CUT&Tag (vs. nuclei), the Digitonin conditions must be optimized for efficient cell permeabilization. We have a full step-by-step procedure outlined here. When using nuclei, CUT&Tag buffers will still contain 0.01% Digitonin, to help prevent beads from forming a film on the sides of tubes during incubations; however, this may not be sufficient for permeabilization of all cell types.
Step 2: Assay Controls
All CUT&Tag experiments should include appropriate controls and quality control checks to evaluate assay success and individual reaction performance.
Quality control checks and success metrics. EpiCypher has incorporated multiple quality control checkpoints throughout the CUT&Tag protocol to help ensure assay success. For instance, we have outlined a simple Trypan Blue staining protocol to confirm nuclei binding to ConA beads, a critical step in CUT&Tag. A full list of quality control checks and metrics can be found here.
Positive and negative control reactions. Reactions using negative control (IgG) and positive control (H3K4me3, H3K27me3) antibodies should be included in every experiment to validate CUT&Tag workflows. EpiCypher recommends adding the SNAP-CUTANA™ K-MetStat Panel of spike-in controls to these positive and negative control reactions, to provide a direct readout of assay success and to guide troubleshooting experiments.
These controls are provided in the CUTANA CUT&Tag Kit. For DIY CUT&Tag Protocol users, the control antibodies and spike-ins described in this section are available for individual purchase; see this article for a list of relevant products.
Spike-in controls. For reactions targeting histone PTMs, EpiCypher offers SNAP-CUTANA Spike-in Controls. SNAP-CUTANA Spike-in Controls are panels of highly pure nucleosomes, each containing a defined histone PTM and accompanying PTM-specific DNA barcode. The nucleosomes come pre-bound to magnetic beads for simple one-step addition to CUT&RUN workflows, allowing users to examine antibody specificity, signal over background, and assay variability. Check to make sure that your target is included in the panel before adding to reactions; see the section about SNAP-CUTANA Spike-ins to learn more.
Step 3: Antibody Selection
Select a target-specific antibody. A quality antibody is essential for generating robust and reliable CUT&Tag data. Key considerations include:
Performance in other assays, such as ChIP, does NOT guarantee success in CUT&Tag! The antibody should demonstrate high-specificity (low cross-reactivity) and high efficiency (comprehensive target recognition) in CUT&Tag.
Use an antibody that has been validated in CUT&Tag. EpiCypher offers antibodies against many histone PTMs, several of which are validated for CUT&Tag. Antibodies that are only verified in CUT&RUN may also work in CUT&Tag, but success is not guaranteed.
When analyzing a new histone PTM in the absence of validated antibodies, we recommend sourcing 3-5 antibodies from various reputable vendors. Test these antibodies in parallel CUT&Tag experiments and select the best antibody based on overall yield, signal over background, and peak structure/enrichment.
Need more help? We cover principles for histone PTM antibody validation in this article.
Step 4: Indexing PCR and Library Quality Control
Indexing PCR. Use the minimum number of PCR amplification cycles that yield ~30 ng total DNA (≥0.5 nM from Bioanalyzer/TapeStation results, 200-700 bp region). This strategy minimizes read duplicate rates while still providing sufficient library for accurate quantification and library pooling.
Analysis of purified sequencing libraries. Examine fragment distribution on the Agilent TapeStation or Bioanalyzer. You should see enrichment of mononucleosome-sized fragments at ~300 bp. A laddering effect may be observed (Figure 1), with peaks at ~200 bp (subnucleosome fragments) and ~500 bp (dinucleosomes).
Primer dimers may appear between 25-100 bp, but typically comprise <5% of the library. If primer dimers are a concern, they can be removed; see this article for guidance.
Troubleshooting low library yields: See this article.
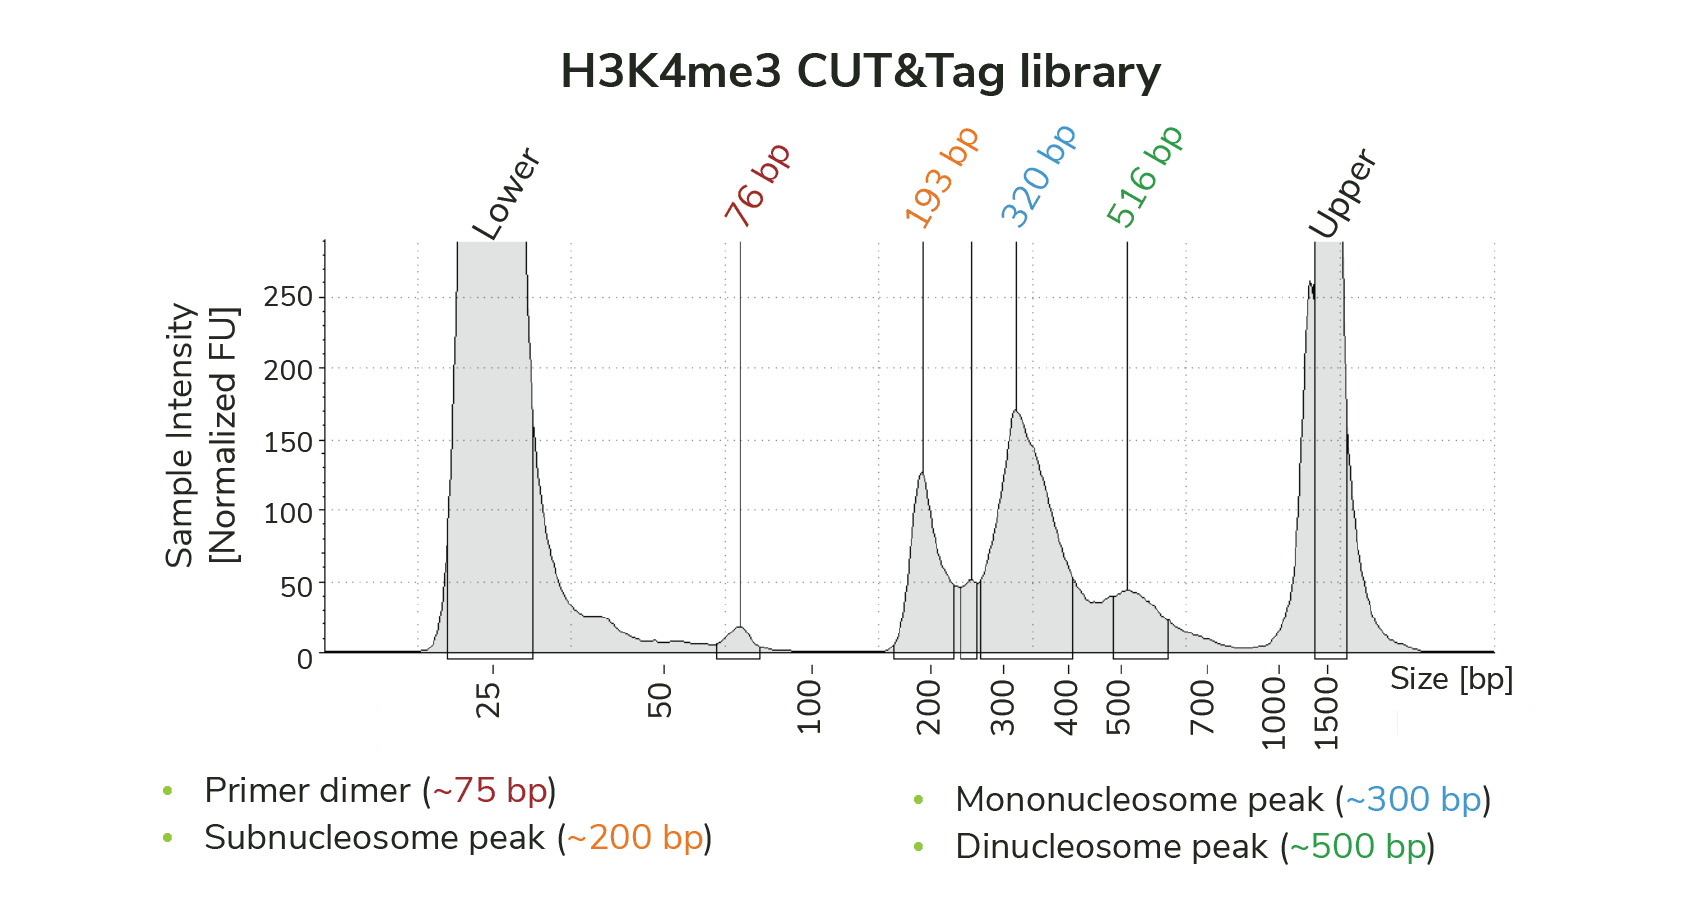
Figure 1. Typical TapeStation trace for a CUTANA CUT&Tag sequencing library generated using an antibody to H3K4me3 (EpiCypher 13-0060).
Step 4: Sequencing
Sequencing depth. The number of sequencing reads depends on several factors, including the number of cells, target abundance, and antibody quality. For most targets, 3-8 million paired-end reads are sufficient and will allow you to multiplex more samples per run.
Read duplicates are often high (up to 70%) due to increased assay sensitivity, but vary by target, cell type, antibody specificity, number of nuclei, and sequencing depth. However, even with high read duplication rates, robust tracks with good read diversity are obtained.
For more information on troubleshooting sequencing in CUT&Tag, see this article.